This chapter describes how to add, edit and import extensions to the system. Extensions are users associated with queues, IVRs and other system features.
Displaying the Extensions Page
All extension tasks are performed from the Extensions page. To display this page, click the Extensions icon on the menu bar.

The following figure shows an example of the extensions page:
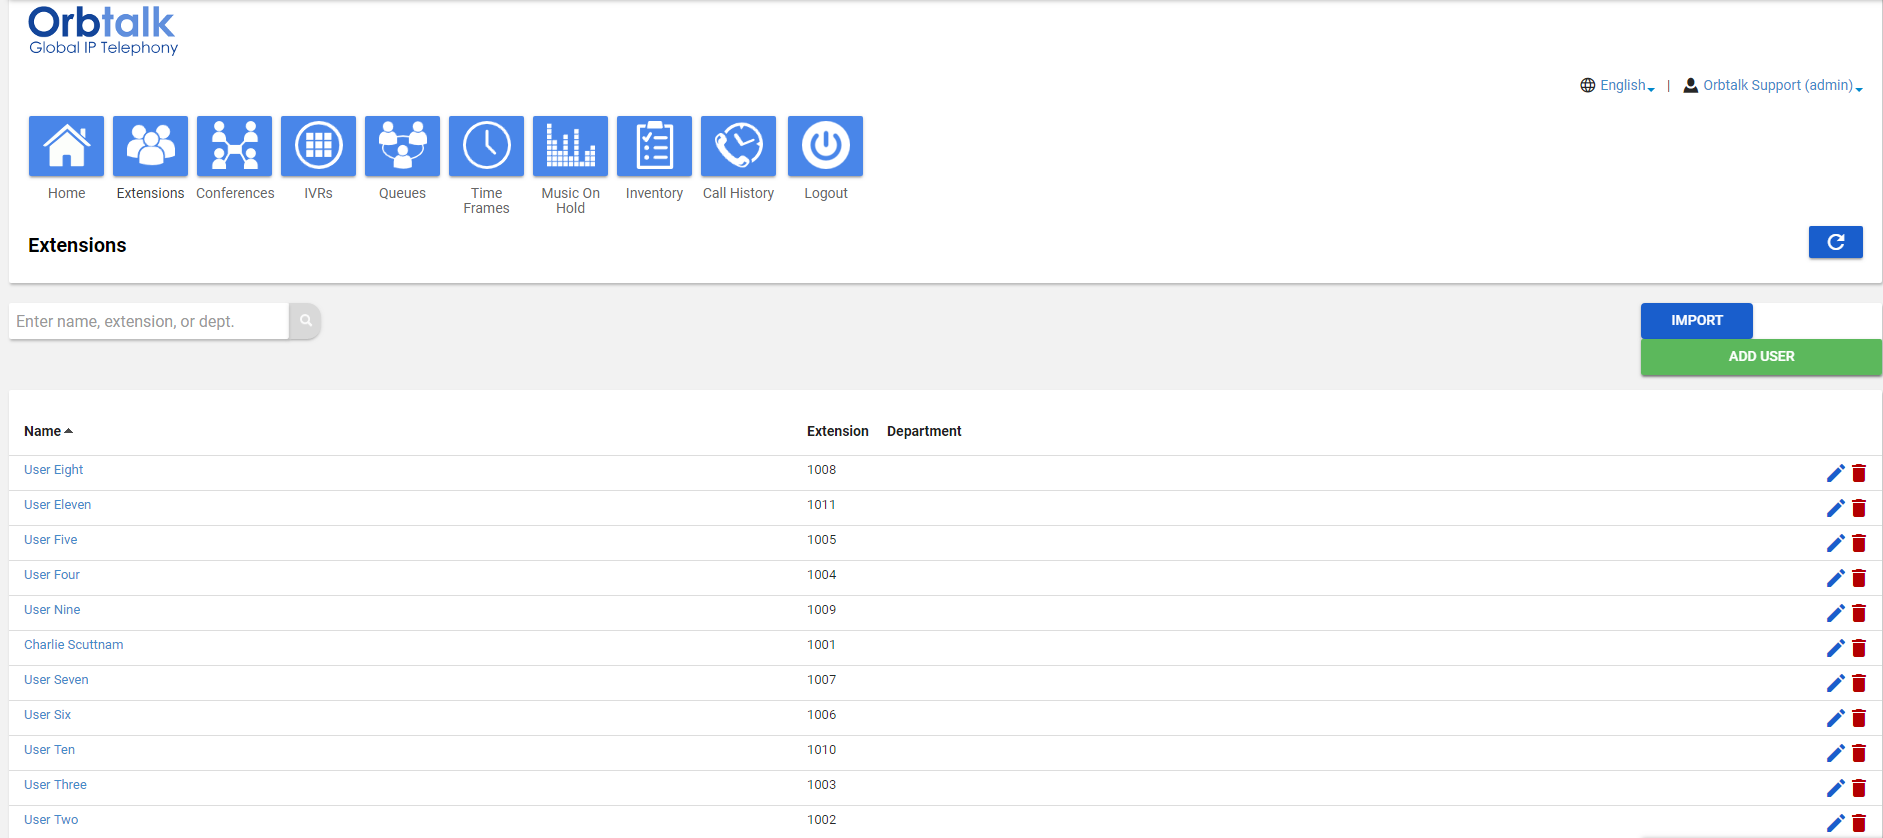
A search field at the top-left of the page allows you to search extensions by entering their name, extension or department and then clicking the magnifying glass icon:

 To sort extensions by name, extension or department, click a black column header. The arrow next to the column header shows whether the items are sorted in ascending (up arrow) or descending (down arrow) order.
The .png)
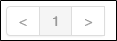
 button at the top-right side of the page refreshes the information on the page. The bottom-left side of the page has controls to display the next or previous page. The bottom-right side has controls to hide system extensions and select the number of extensions shown per page.

|
Where to go from here: From the Extensions page, you can:
|
|---|
Adding Extensions
- Click the Staff Logins button. If you are using a lower amount of extensions than amount that are available you will be able to add additional extensions by clicking the Create extension button. A 'Create extension' pop-up window similar to the following appears. (The options in your window might differ from the ones shown below.)
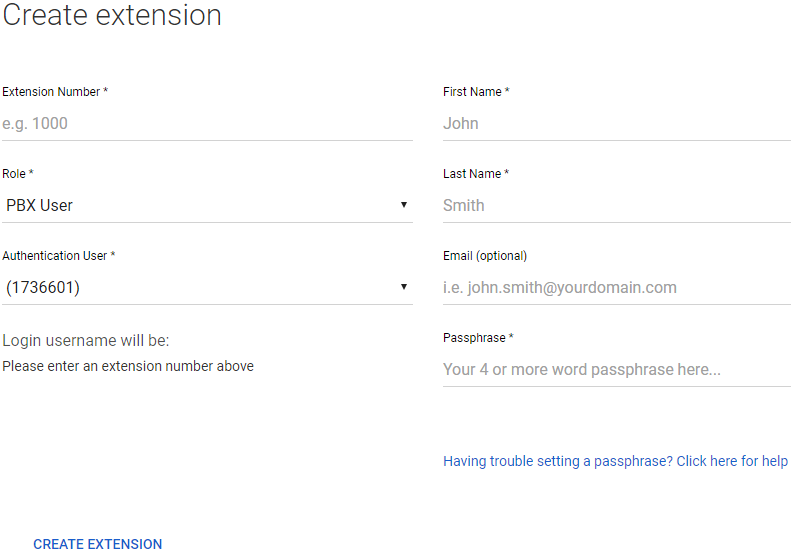
- Complete the fields (see Table 4-1).
- Click Add Extension.
Table 4-1. Adding/Editing a Extension
| Setting | Description |
| Extension Number | Enter the user's extension number. |
| Role |
Select the user's access level. Choices are the following:
|
| Authentication User | The trunk that the extension will use to make calls. You will normally only have one option here. |
| First Name | Enter the user's first name. The dial-by-name directory can match on this field, but will by default match Last Name. |
| Last Name | Enter the user's last name. The dial-by-name directory can match on this field. |
| Email (optional) | Enter the user's address used for email, password resets, etc. |
| Passphrase | Enter a new login passphrase for the extension. For security, each typed password character is masked by a dot. |
Editing Extensions
There might be times when you need to edit extensions. For example, you might need to change names, passwords, answering rules, voicemail or phone settings.
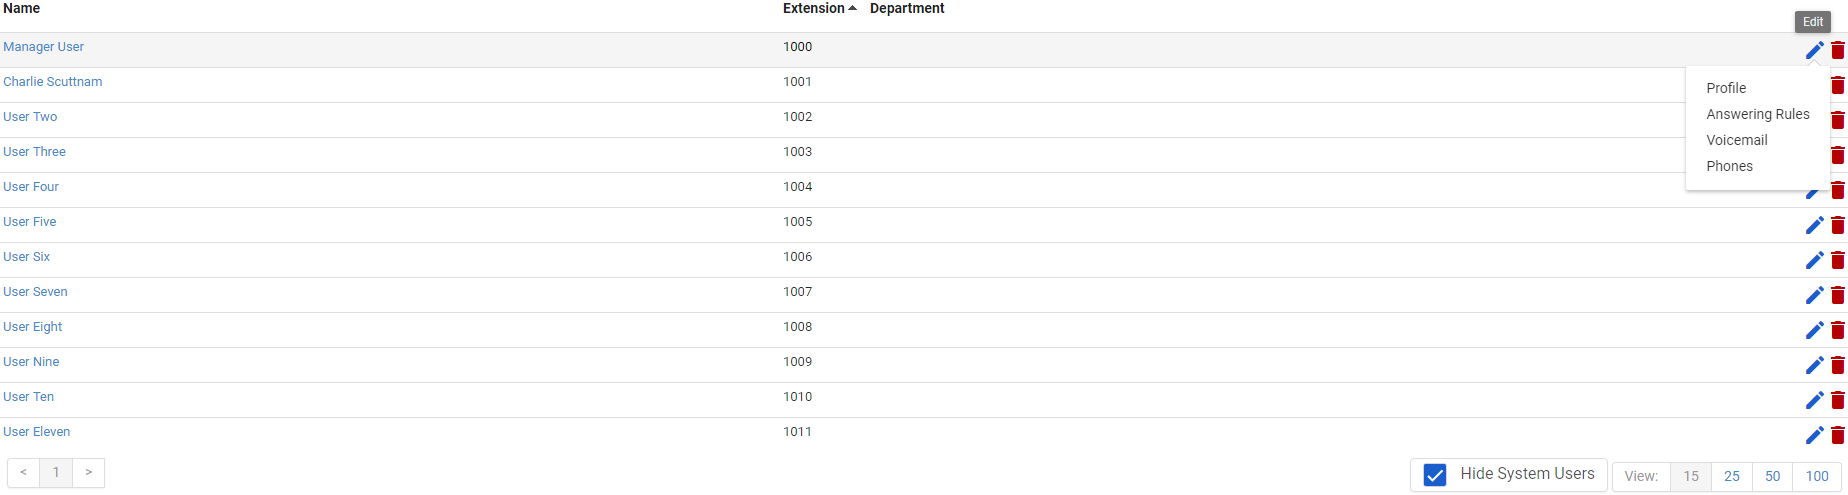
- From the Extensions page, either:
- Click a name OR
- Hover over a user name, click the
.png)
 icon at the far right of the Extensions page and then click Profile. For example:
|
Where to go from here: When a page similar to the following appears, use the tabs to configure settings for this extension:
|
|---|
Configuring the Extension Profile
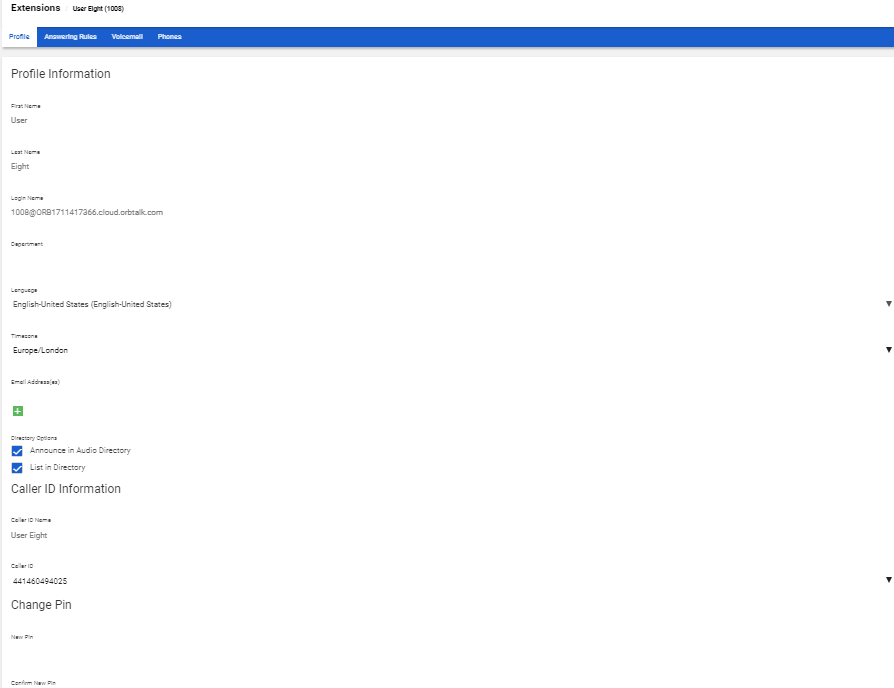
To configure the profile for the selected extension, complete the fields in the Profile tab and then click Save.
Note: The options in your tab might be different than the ones shown below.
| Setting | Description |
| Profile Information | |
| First Name | Enter the user's first name. |
| Last Name | Enter the user's last name. The user's last name is particularly important for the dial-by-name directory, as it matches on this field. |
| Login Name | Read-only field that shows the login name this user uses to log in to the portal. |
| Department | Enter the department to which the user belongs. If two or more extensions are in the same department, they can answer each other's calls by dialling *8. |
| Language | Enter the language that is used by this user. |
| Timezone | Enter the user's timezone. |
| User's Scope | Select the level of visibility that you wish the user to have when they login to the portal. Office Manager will allow them to amend settings system-wide whereas Basic User will only allow them to amend settings pertaining to their own extension. |
| Email Address(es) | Enter the user's address used for email, password resets, etc. To add email addresses, click the green plus icon. |
| Directory Options |
Enables or disables announce in audio directory and list in directory features.
|
| Change PIN | |
| New PIN | Enter a numeric login password for the extension. For security, each typed PIN character is masked by a dot. This is also the PIN used to access the user's mailbox. This must be eight digits and cannot be a common or easily guessable sequence e.g. 12341234 or 12345678. |
| Confirm New PIN | Enter the same numeric login password you entered in the New Password field. For security, each typed password character is masked by a dot. |
Configuring Extension Answering Rules
Answering rules define how calls to this extension are handled. To configure answering rules for the selected extension:
- From the Extensions page, click the Answering Rules tab. A page similar to the following appears.
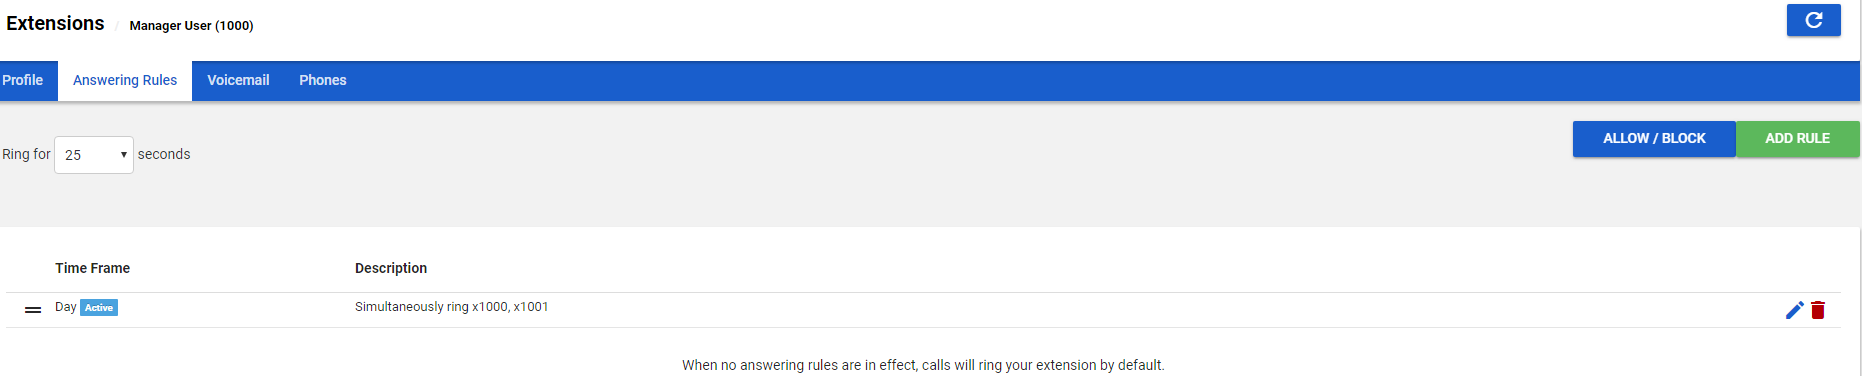
- Use the Ring for drop-down list to select the maximum number of seconds that incoming calls ring for this extension before the system routes the call to the extension's voicemail or the Forward if Unanswered option, if configured.
- From this page, you can:
- Allow or block calls for this extension (see 'Allowing or Blocking Calls').
- Add answering rules for this extension (see 'Adding Answering Rules').
- Change the active rule for this extension (see 'Changing the Active Answering Rule').
- Edit answering rules for this extension (see 'Editing Answering Rule').
- Delete answering rules for this extension (see 'Deleting Answering Rules').
Allowing or Blocking Calls
To allow or block calls for this extension:
- Click the Allow/Block button. The Allow/Block pop-up window appears.
.png)
- Calls from allowed numbers bypass call screening and server side Do Not Disturb (not phone DND). To allow numbers for this extension, enter a number in the Enter a number field under Allowed Numbers and then click the plus sign next to this field. Repeat this step for each additional number you want to allow for this extension.
- Clls from blocked numbers receive a fast busy or number disconnected message. To block numbers for this extension, enter a number in the Enter a number field under Blocked Numbers and then click the plus sign next to this field. Repeat this step for each additional number you want to block for this extension.
- To block anonymous or unknown numbers, check Block anonymous or unknown.
- Click Done.
Adding Answering Rules
Adding additional answering rules allows you to specify alternate call answering rules in a different time frame (for example, handle calls differently on a weekend than on a weekday). To add an answering rule for this extension:
- Click the Add Rule button. The Add an Answering Rule pop-up window appears.
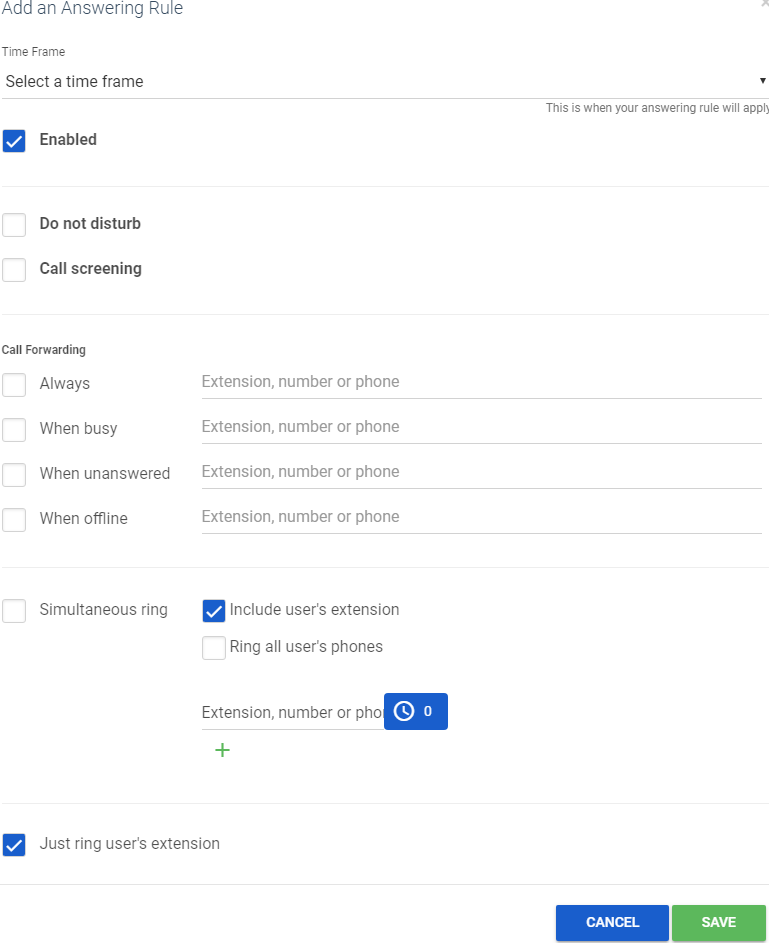
- Complete the settings in the Add an Answering Rule pop-up window.
Table 4-2. Adding/Editing Answering Rules
| Setting | Description |
| Time Frame | Select a time frame to which this answering rule will be applied. Choices shown are the ones previously configured using the procedure under 'Adding Time Frames'. |
| Enabled | Enable (check) or disable (uncheck) this time frame for this user. |
| Do not disturb |
Enables or disables the Do Not Disturb feature. Choices are:
|
| Call screening |
Enables or disables the Call Screening feature. Choices are:
|
| Call Forwarding options |
Select the following appropriate Call Forwarding settings. When entering another extension as a Call Forward option, a drop-down menu allows you to forward the call to specific resources associated with that extension (see Table 4-3). Some settings might not appear, depending on the features associated with the given extension. Choices are:
The number that you wish to forward calls to needs to be entered in international format e.g. 442035888000. |
|
Simultaneous ring allows multiple phones to ring at the same time. Check boxes allow you to include the user's extension, ring all extensions at the same time and use answer confirmation for offnet numbers.
In this field, you can enter the extension of another telephone you want to ring. The clock icon allows you to specify a ring delay. A ring delay allows you to enter the amount of time before the call rings at the destination. To add other phones to the simring, click the green plus icon. |
|
| Just ring user's extension |
Enables or disables the ringing of your telephone only.
|
Table 4-3. Call Forward Selections
| Selection | Description |
| Extension | Forward calls to the user at the specified extension and follow their extension-answering rules. |
| Handset | Bypass the extension-answering rules and forward calls to the handset associated with the specified extension. |
| Voicemail | Forward calls to voicemail at the specified extension. |
| Queue | Forward calls to a queue. |
| IVR | Forward calls to an IVR. |
3. Click Save.
4. Repeat this procedure to add answering rules for this extension.
Changing the Active Answering Rule
You can define multiple answering rules, but only one rule can be active at a time. The active rule is the first rule with a matching time frame. Best practices dictate that you order answering rules according to how specific they are, with the most specific time frames (for example, Holidays) at the top.
Assume today is Monday the 25th of December. In this example, the Holidays and Open time frames could match the time and date conditions for the 25th of December. If Holidays is the first rule, however, it becomes the active rule. But if Open is the first rule, Open becomes the active rule.
To specify a rule other than the top one as the active rule:
- In the Answering Rules tab, find the rule you want to designate as the active rule.
- On the left side of the Answering Rules tab, hover the mouse over the up/down arrows for that rule (the pointer changes to a 4-headed arrow).
- Hold down your mouse button, drag the rule to the top row and then release the mouse button.
- The Active designation appears next to the topmost time frame.
Editing Answering Rules
To edit an answering rule for this user:
- In the Answering Rules tab, hover over the answering rule and then click the icon at the far right of the row.
The Edit Answering Rule pop-up window appears. - Change the rule, as appropriate. For instance, see Table 4-2.
- Click Save.
Deleting Answering Rules
If you no longer need an answering rule for an extension, you can delete the rule. You can delete any answering rule, except the default rule.
- In the Answering Rules tab, hover over the answering rule and then click the
.png)
 icon at the far right of the row.
.png) A confirmation prompt appears.
A confirmation prompt appears. - Click Yes to delete the rule or No to retain it.
Configuring Answering Rules - Divert calls outside of business hours
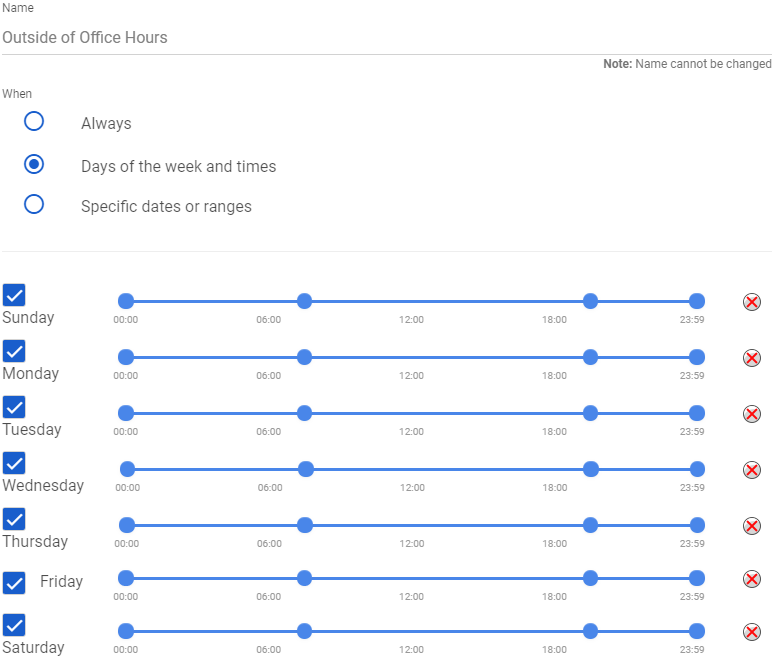
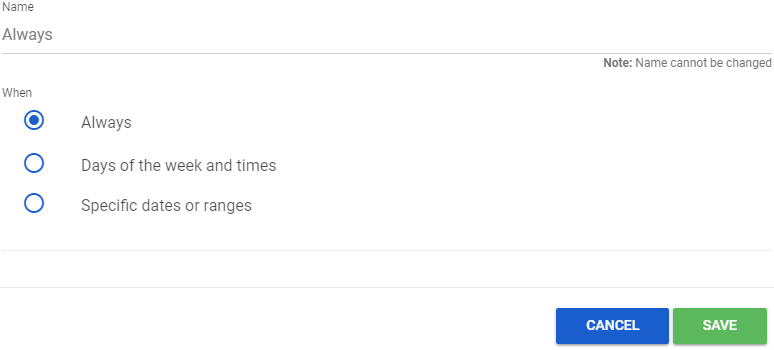
If you wish to have calls diverted to voicemail outside of your office hours, you need to have two answering rules, one specified as 'Always' and another specified as 'Out of Office Hours'. As a prerequisite, you will need to have two Time Frames created before creating the Answering Rules. One Time Frame would be specified as 'Always' and another Time Frame would be specified as 'Outside of Office Hours'.
The reason why you need to create two Time Frames is because you can only have one active Answering Rule. Each Answering Rule uses one specific Time Frame, the active Answering Rule automatically changes depending on what time ranges you set for your 'Outside of Office Hours' time frame. The below example is set for 10am - 7:30pm, Monday to Sunday. If for example, a call was to come in between 7:31pm to 9:59am, the active answering rule would be your Out of Hours answering rule so the call would go to voicemail immediately. If, however, a call came in at some point between 10am to 7:30pm, the active answering rule would be 'Always' which would mean the call would go through to your extension. You can see two separate Time Frames below for 'Always' and also to define 'Outside of Office Hours' for your business.
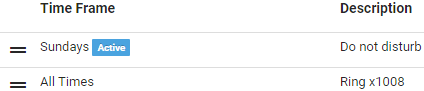
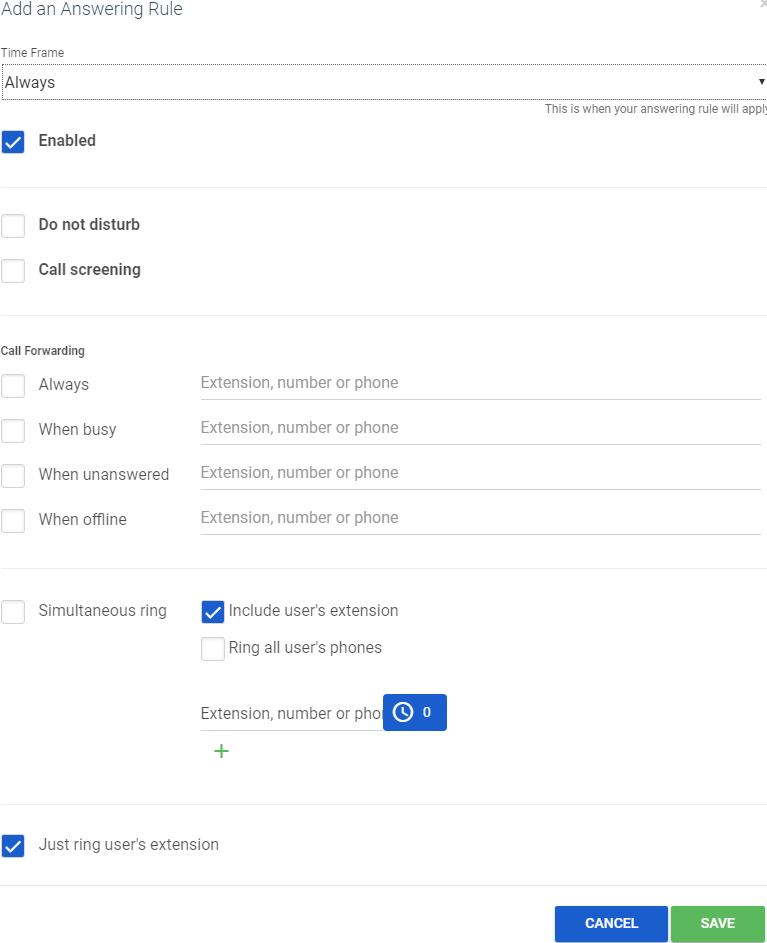
Once the Always and Out of Hours time frames are created, you can go back to Answering Rules and create two separate Answering Rules. One Answering Rule will be used for 'Always' and another Answering Rule will be used for 'Outside of Office Hours' which you can see below:
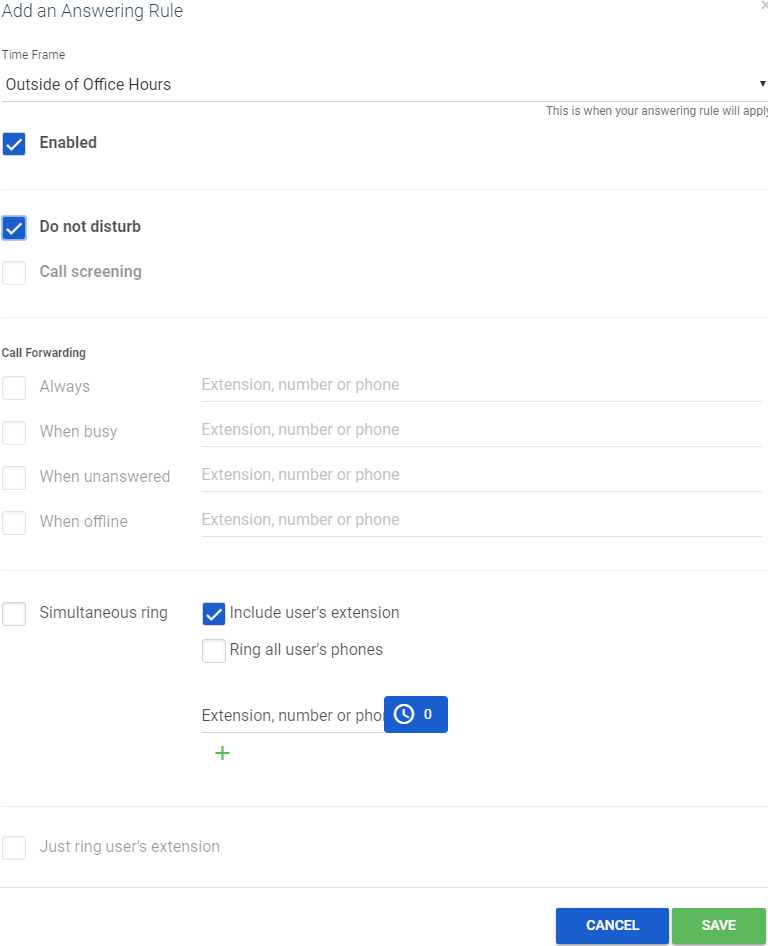
Please bear in mind that the Outside of Office Hours Answering Rule needs to have 'Do Not Disturb' ticked if you wish to have calls go through to voicemail automatically. Once you have saved both Answering Rules to setup your Outside of Office Hours divert, you can see how the Answering Rules will appear below:
- Default Answering Rule: As you can see above, if you plan on configuring an Answering Rule to divert calls outside of office hours, you would need to disable the Default answering rule. You can do this by editing the Default answering rule and you will need to untick 'Enabled'.
- Prioritising Answering Rules: If the 'Always' answering rule is listed above the 'Outside of Office Hours' answering rule, the divert will not work. Therefore, you will need to have the 'Outside of Office Hours' answering rule listed above the 'Always' answering rule as you can see in the above screenshot.
The Cloud PBX will then switch the 'Active' answering rule depending on the time of day. During your office hours, the 'Always' answering rule would become Active automatically. Similarly, out of hours, your Outside of Office Hours answering rule would then become active automatically and all calls to the extension would go to voicemail.
Configuring Answering Rules - Setting up Multiple Out of Hours Diverts (voicemail and mobile/landline divert simultaneously)
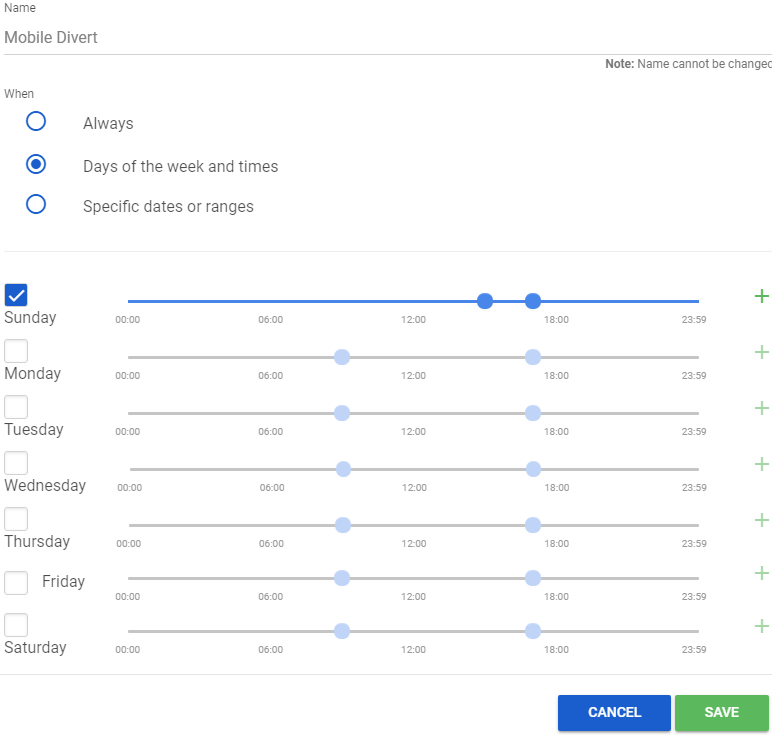
If you wish to have both an Outside of Office Hours and a mobile/landline divert, you will need to create a new Time Frame for the mobile/landline divert. In the example below, we have used a Mobile Divert. In the example Time Frame below, we would like the Cloud PBX to forward calls to a mobile only on Sundays from 3pm to 5pm (UK time).
Please see the Mobile Divert Time Frame below:
In your Extension's Answering Rules, you can then click Add Rule to create the Mobile Divert answering rule:
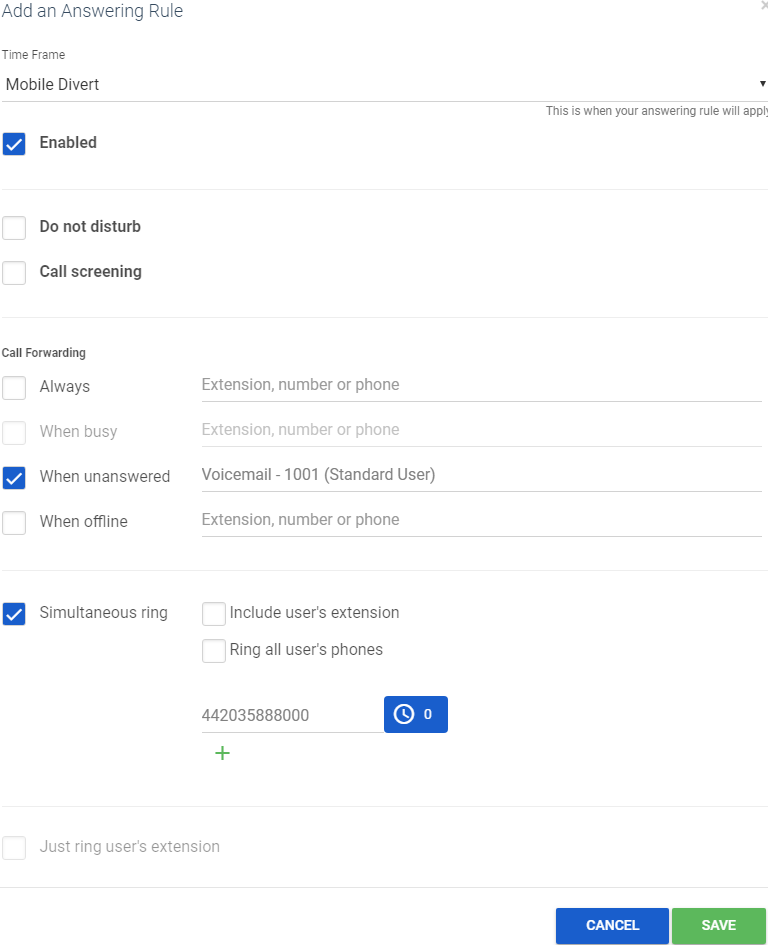
- You will need to select the Mobile Divert time frame which you just created in the Time Frame drop-down menu.
- Specify a 'When Unanswered' forward to your extension's voicemail.
- Tick 'Simultaneous Ring'.
- Untick 'Include user's extension' and 'Ring all user's phones'.
- Enter the full phone number of your landline/mobile in international format (e.g. 442035888000 instead of 02035888000).
- Click Save.
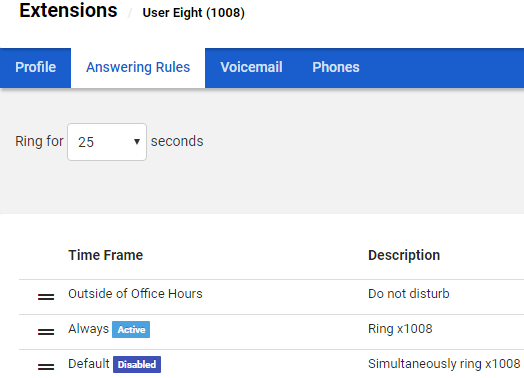
Once you have saved the Mobile Divert answering rule, your answering rules should appear as seen below:
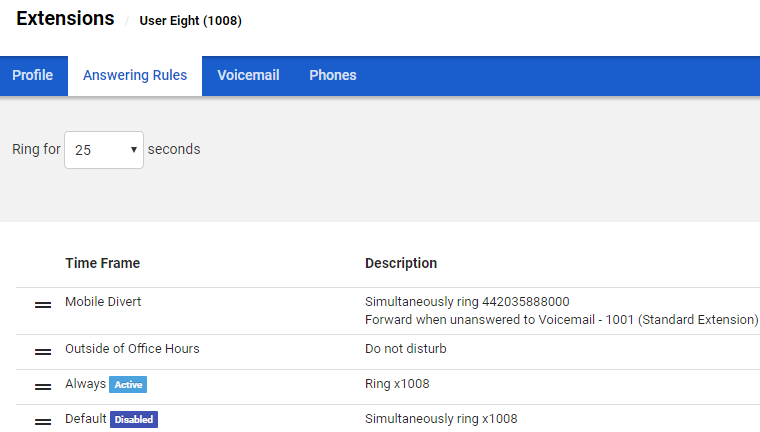
- Prioritising Answering Rules: You will need to have the 'Mobile Divert' answering rule listed above both existing answering rules as you can see in the above screenshot.
- Extension Ring Time: The extension's ring time of 25 seconds (in the above screenshot) will also be the ring time for the forward. If a call went to the mobile and the call was unanswered, the call would then come back to the Cloud PBX and to the extension's voicemail.
Configuring Extension Voicemail
To configure voicemail for the selected user:
- From the Extensions page, click the Voicemail tab. A page similar to the following appears.
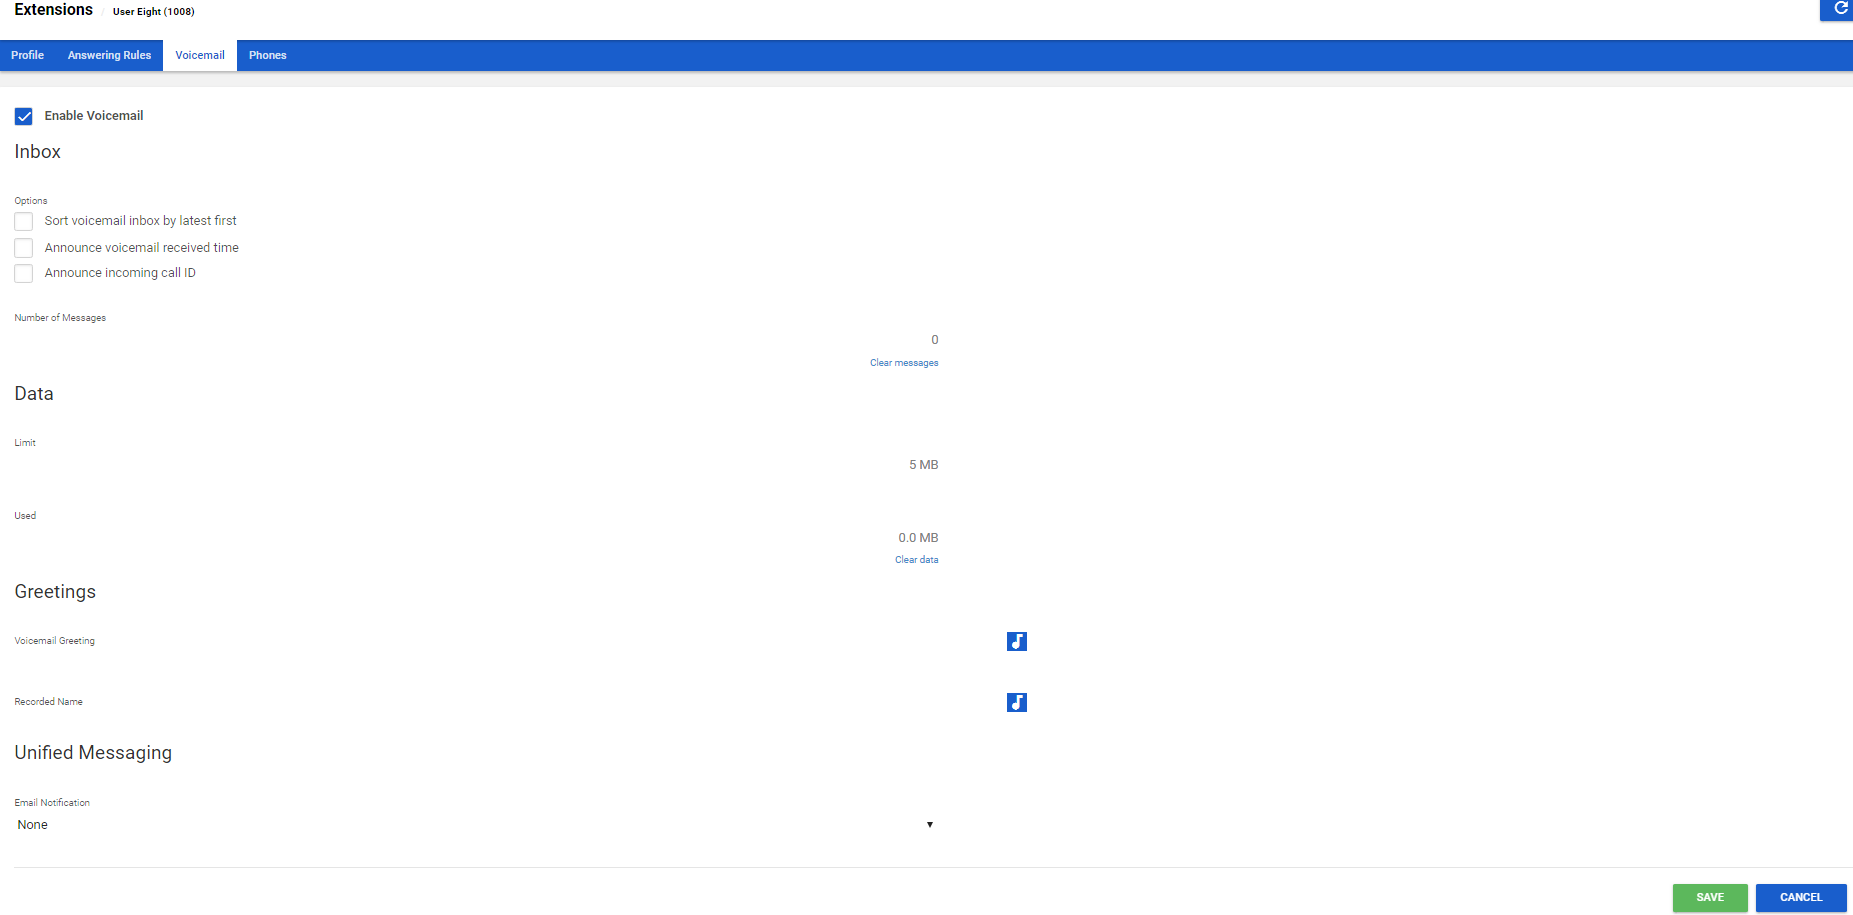
- Complete the settings in the Voicemail tab.
Table 4-4. Voicemail Settings
| Setting | Description |
| Enable | Enable (check) or disable (uncheck) voicemail. |
| Inbox | |
| Options |
This setting affects audio voicemail (calling into voicemail), but does not affect the web portal voice messages. Check the appropriate inbox options. Choices are:
|
| Number of Messages | Read-only field that shows the current count of messages. Click the Clear messages link to delete messages, but leave greetings in place. |
| Data | |
| Limit | Read-only field that shows extension's storage limit. |
| Used | Read-only field that shows extension's used storage. Click the Clear data link to delete all messages, greetings and the name recording. |
| Greetings | |
| Voicemail Greeting | To select an active voicemail greeting, click a greeting from the drop-down list. To play the selected greeting, click the To download the selected greeting, click the To upload or record a greeting, click the To upload a greeting:
To record a greeting:
|
| Recorded Name | If your company has a dial-by-name directory, you must record your name to appear in the directory. Click the |
| Unified Messaging | |
| Email Notification |
Adjust your voicemail to email settings. Choices are:
|

 icon.
icon.
 icon.
icon..png)
 icon to display the Manage Greetings pop-up window. Greetings must be in MP3 or WAV format.
.png)
.png)
3. Click Save.
Configuring Phones
To associate phones with the selected extension:
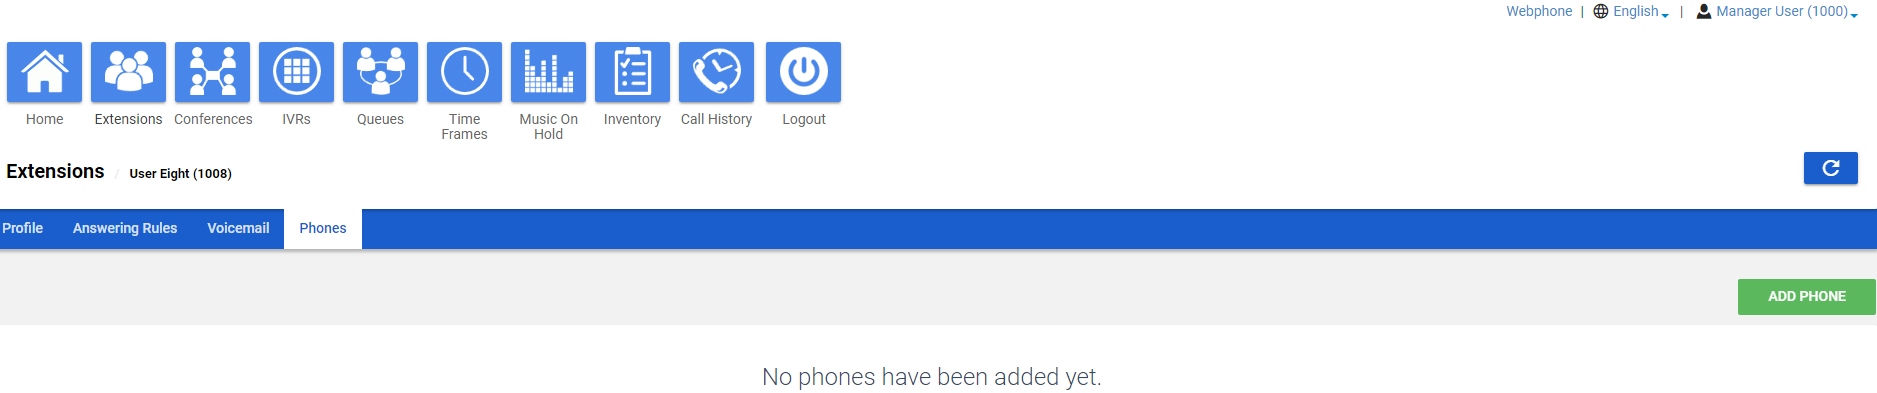
- From the Extensions page, click the Phones tab. A page similar to the following appears.
|
Where to go from here: From the Phones tab, you can:
|
|---|
Associating Phones with This Extension
To associate phones with this extension:
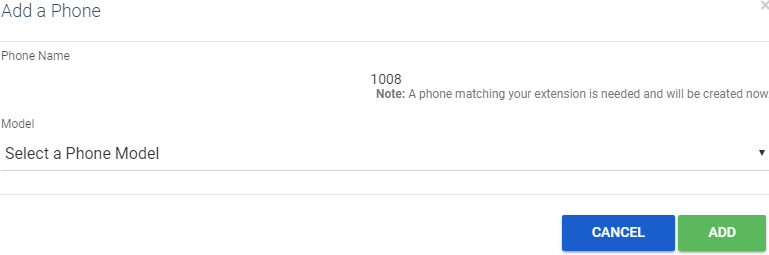
- Click the Add Phone button. The Add a Phone pop-up window appears.
-
Complete the settings in the Add a Phone pop-up window.
Table 4-5. Adding/Editing PhonesSetting Description Phone Name Adding a phone: Enter a name for this phone. The name should allow you to differentiate this phone from other phones you associated. For example, if you add phones for x111, you can name them 111a, 111b and so on.
Editing a phone: read-only field that shows the name of the phone.
Model Select the telephone model. The remaining settings in the window change depending on the model selected. - Click Add.
- Repeat this procedure to associate additional phones with this extension.
After you configure all phones, reboot the phones to apply these settings.
Editing Phones
To edit a phone associated with this extension:
- From the Phones tab, either
- Click a name OR
- Hover over a name and then click the
.png) icon at the far right of the page. For example:
icon at the far right of the page. For example: Either step displays the Edit Phone pop-up window.
- Change the phone settings, as appropriate. For assistance, see Table 4-5.
- Click Save.
Deleting Phones
If you no longer need a phone that is associated with this extension, you can delete the phone.
- In the Phones tab, hover over the phone and then click the
.png) icon at the far right of the row. A confirmation prompt appears.
icon at the far right of the row. A confirmation prompt appears. - Click Yes to delete the phone or No to retain it.
.png)
Importing Extensions
A quick way to add extensions into the system is by importing them. The system accepts extensions in comma-separated-value (CSV) format. As part of this procedure, you can download a CSV-formatted template that can be opened using Microsoft Excel, populate the template with users and then import the template.
- From the Extensions page, click the Import button. The Import Users pop-up window appears.
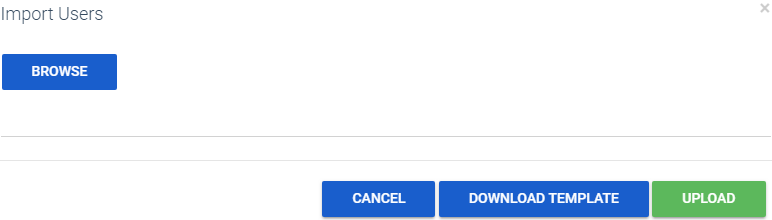
- To download a template that you can populate and import into the system:
- Click the Download Template button.
- Save the template to an area you can access.
- Open the template, populate it with extensions and then save the template.
- Click the Browse button, navigate to the location where the file containing the extensions to be imported is located, click the file and then click Open.
- Click Upload. The system shows a preview of the data to be imported and allows you to edit the values if needed.
Deleting Extensions
If you no longer need an extension, you can delete the extension from the system.
- From the Extensions page, hover over the extension and then click the
.png) icon at the far right of the row. A confirmation prompt appears.
icon at the far right of the row. A confirmation prompt appears. - Click Yes to delete the extension or No to retain it.
.png)

