The following guide is for configuring a Polycom SoundPoint IP 321/331 with your VoIPtalk account.
You will need:
- The VoIPtalk ID – You can find it by logging to your VoIPtalk panel via the website voiptalk.org
- The VoIPtalk password – Go to the bottom of the page in case you need assistance with it.
- The Proxy / SIP server – 'voiptalk.org'
- The Proxy port – '5060'
- The Outbound proxy server – 'nat.voiptalk.org'
- The Outbound proxy port – '5065'
1-) Connect the Polycom SoundPoint to the network (Router or Switch) using an Ethernet cable, make sure that you have at least 1 computer connected to the same network on which the Polycom SoundPoint is connected.
2-) Find the IP address of the device by pressing the phone menu, scroll through to status > Platform > phone > scroll through until you see the IP address. You can also get the IP address just after the handset boots up.
3-) On a computer which is connected to the same network as the phone, launch the web browser and type that IP address (including the dots) into the address bar.
4-) Login to the device's web interface using the following details (default):
Username – 'Polycom' (case sensitive)
Password – '456'
5-) On the next screen, select the SIP Tab and enter the details as follow:
Servers > Outbound proxy
Address – 'nat.voiptalk.org'
Port – '5065'
Servers > Server 1
Address – 'voiptalk.org'
Port – '5060'

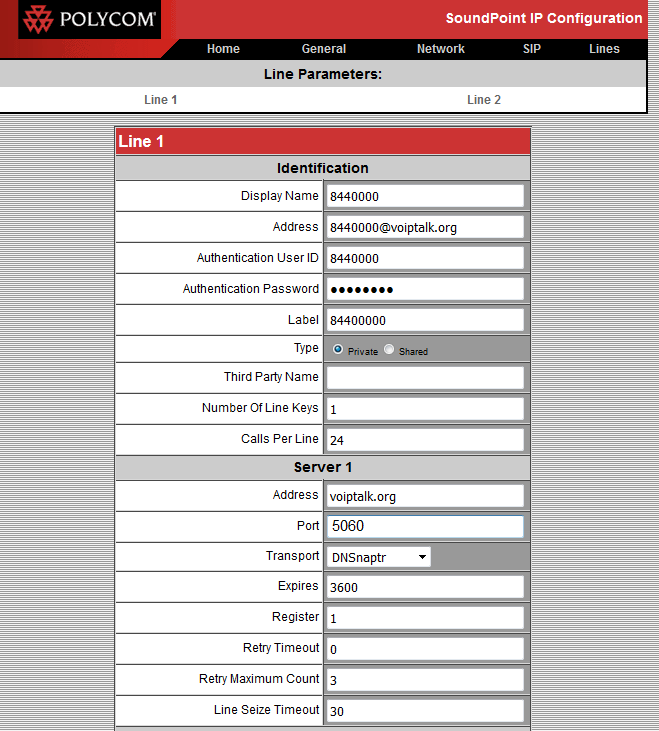
6-) Click Submit and wait for the phone to reboot. When it is back on line, refresh, or log back into the web page (if it has expired) and select the 'Lines' tab
7-) Fill in the following details
Identification
Display Name: VoIPtalk ID
Address: VoIPtalk ID@voiptalk.org
Authentication user ID: VoIPtalk ID
Authentication password: VoIPtalk password
Label :VoIPtalk ID
Server 1
Address: voiptalk.org
Port: 5060

8-) Click submit and the device will reboot again. When the handset is back online dial 902. If you hear a congratulation message, then the account is registered.

